![]() he first steps of building a castle gate are identical to the first steps of building a wall section, and then the difference shows.
he first steps of building a castle gate are identical to the first steps of building a wall section, and then the difference shows.
The inner wall (Part G5)
Follow the flap and cut sequence on the picture below (or the copy on page 7). The yellow area has to be cut out in sequence step 14.
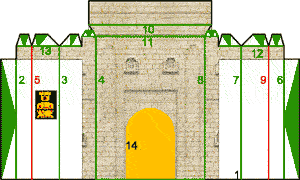
The only flaps glued in this step are the two small ones at each end of folding line 11.
The parapet (Part W4)
When cut out and folded glue it to the inside wall section. It is best to glue one of the sides (i.e. along folding line 13 of the inner wall) first. Than glue the wide side to the inner wall of the inner wall. And than glue the other side to the inner walls side along folding line 12. Just like described in the wall section.
The outer wall (Part G1)
The wall can be found on page 6. Again there is a very small stylized picture on top of the page showing the folding and cutting lines and their sequence. And again the yellow marked areas have to be cut out at the appropriate sequence step.
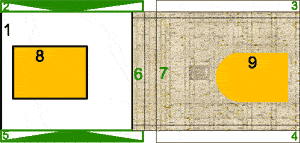
The two flaps are glued to their white counterparts (lines 3 and 4) and when completed you will have a very thin box, which is open at the bottom and has two big holes.
On part G1 (but not on the picture above) are two black lines to the left and right of the area labelled 8. They are neither folding nor cutting lines, but are guidelines where the assembly of inner wall and parapet are glued on, which is the very next thing to do.
Ascending Tunnel (Part G7)
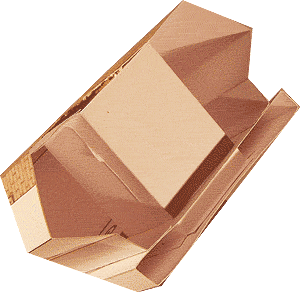
When cut out and all the green flaps are folded away from the printed side, the red flap has to be folded towards the printed side and than the floor (the none brick pattern) has to be folded towards the printed side along the line where floor and wall meet. This will form an ascending tunnel which is glued inside the inner wall assembly. Looked at from the bottom it should be like this:
Inner floor (Parts G2 and G3)
Business as usual, except that the floor is divided in two parts, because the tunnel cuts the floor apart.
The gate house (Part G4)
When finished cutting and folding according to the plan below,
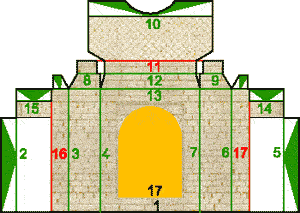
it is time to glue the two small flaps on the left and right of folding line 13 to the brick wall section with the numbers 8 and 9 in.
Next the Flaps at line 14 and 15 are glued to the parapet. When you do this the floor will press the inner part of the wall (above the numbers 8 and 9 in the schematics) in place. Also the parts that have the numbers 8 and 9 will move towards the part with the number 12. Make sure that parts "8" and "9" are below part "12" similar to the way it is done when building a tower.
And after that, glue it centred in front of the outer wall (Part G1).
The other tunnel (Part G6)
It is folded like Part G7 and glued into the gate house. From the top the complete gate section now will look like that
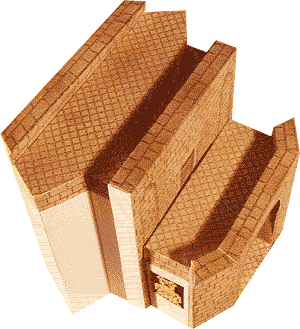
The drawbridge base (Part S1)
The smallest piece is also the most complicated.
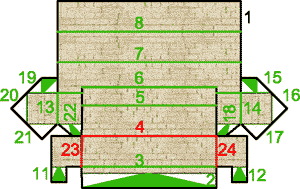
When folded you will get an idea how the pieces will fit. Glue flaps 11/12 to the underside of the bricks labelled 222/14. If done correctly, the parts along folds 23/24/3/4/5 will "fall" in place. Now glue flaps 15/19 and 16/20, so they form the sides of the assembly and last glue the "back" to all "open" flaps.
The completed assembly is glued centred to the gate house.
Hopefully it will look like the picture below
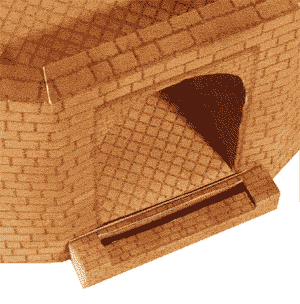
The drawbridge (Parts B1a, B1b and B2)
To my great dismay I didn't find a way to construct a working drawbridge from paper only. I would have needed at least a toothpick and a length of thread. So there is only a fake bridge, two in fact. One to be used when the drawbridge is raised and one to show the lowered stage. When raised the bridge is stuck into the base's gap when lowered it just rests on the base. There are two bridges, because it was the only way to make sure that the visible side has no visible joints.
Any number of B2s can be glued between B1x and its backfolded flaps to five the bridge some thickness.
And that's that.